
My Top 5 Bathroom Renovation Blunders So You Can Avoid Them!
I must be crazy! In the last three years, I have done two complete home renovations, including three bathroom renovations. I kicked off the first renovation in May 2020, just as COVID was getting serious, and the second I have just completed.
I had never renovated a single bathroom, yet alone two entire homes, so needless to say, there were some learning curves along the way. I made some mistakes that I have to now live with until the next renovation (if I can even bear to put myself through another!), and surprisingly, or not surprisingly, all my mistakes took place in the bathroom.
So today, I thought it might be helpful to delve into the world of bathroom renovations, uncovering my top bathroom renovation blunders to ensure you choose a better path. Whether you’re a seasoned DIY enthusiast or hiring professionals, it’s crucial to steer clear of these top 5 blunders that could leave you with a less-than-ideal bathroom—like mine!
Join me as I explore each pitfall and provide advice on how to sidestep these errors, ensuring a successful and stress-free renovation journey.
Key Takeaways
- Bathroom renovations can be challenging, especially for beginners. Common mistakes include using unsuitable materials, miscalculating tile needs, not checking wall alignment, not supervising mirror installation, and hiring a tiler without reviewing their work.
- To avoid these, research materials, measure accurately, ensure walls are square, be present during key installations, and assess a tiler’s work before hiring.
- Mistakes can often be fixed or worked around, and the end result can still be a beautiful, functional bathroom.
- For a successful renovation, read guides, ask professionals for advice, and take your time to plan and prepare.
Choosing to Use VJ Panelling in My Bathroom
Yes, I am guilty of jumping on the ‘VJ panelling in bathrooms’ trend. And while I’m not 100% against using it, you have to be very careful of where you instal it. Let me explain. My last renovation was my investment property. So, to keep costs a little lower, I thought using VJ on two of my walls would a) be cheaper than paying for tiles and a tiler and b) be easier to remove if I want to renovate the bathroom again ten years later.
In theory, this seemed like a good idea. But you can’t just use standard VJ panelling in a bathroom. You have to use a semi-exterior one, which is recommended for high-moisture areas. So, instead of paying around $80 per 2400mm panel, you’re paying $150 per panel. On top of this, I decided to instal it along the wall opposite my walk-in shower. And while there was over 1.2 m from the shower head to the VJ panelling, the water still splashed up and wet the VJ.
So, I ended up having to do a kick-tile along the base of the VJ panelling to protect it from being in direct contact with water when showering.
So, when it comes to VJ panelling in bathrooms, take the time to research and select an appropriate product for the space. If you’re looking for something that’s moisture-resistant for high-humidity areas like showers, opt for a semi-exterior VJ board or look into alternative materials suitable for bathrooms, such as white wall tiles or even wet wall panels if you’re after a tile alternative. Taking the time to research and select bathroom products can have a huge impact on the longevity of your renovation as well as its aesthetic appeal.
Miscalculating My Tile Requirements
I still don’t know how I managed this, but I did not have enough Terrazzo Grey tiles for one of my three bathroom renovations. I’m sure this happens to the best of us; it’s easy to miscalculate how many tiles you’ll need for your renovation, especially if you’re tiling both walls and floors. But this caused a significant issue because my tiler was here and had no tiles to finish the job. And it wasn’t a matter of running to the shops to get more tiles. My bathroom tiles were shipped directly from our warehouse.
Moreover, you can’t just order more of the same tile. Tiles are made in batches, and if you don’t get tiles from the same batch, there will likely be obvious colour differences. So, with no easy solution, I actually had to use a completely different tile for one of the walls. Thankfully for me, our Matt White Wall Tile (Rectified) 300x600mm tile looks great in any bathroom and complements the Terrazzo Grey tile nicely.
So, how can you avoid this mistake? Well, first, it’s important to measure both your floor and wall space and add at least 10% for ‘wastage’. Remember, having enough tile not only ensures your renovation will run smoothly and on time, but it will also save you money too! So make sure to purchase the right quantity of tile that suits both your needs and budget.
Not Checking That the Walls Were Square Before Sheeting
Probably my biggest oversight in my bathroom renovations was not checking to make sure my walls were square. Don’t assume that your builder has done this either; I did, and now my walls are all out! This may not sound like a big deal, especially if you can’t see it with the eye, but I used the Charli Wall Faced Toilet Suite and our Walk-In Glass Shower Panels, which meant they don’t sit flush against the wall. The shower panel needed excess silicon to fill the gap-not a good look!
If you find yourself in this situation (like I did), you won’t achieve the level of perfection you’re after, and you’ll have to live with the results until the next renovation. Simply ensuring that the wall or walls that your shower and toilet will be installed on are square before you start sheeting can easily prevent this. You can use a few techniques to do this, such as using a spirit level or seeking professional assistance if needed.
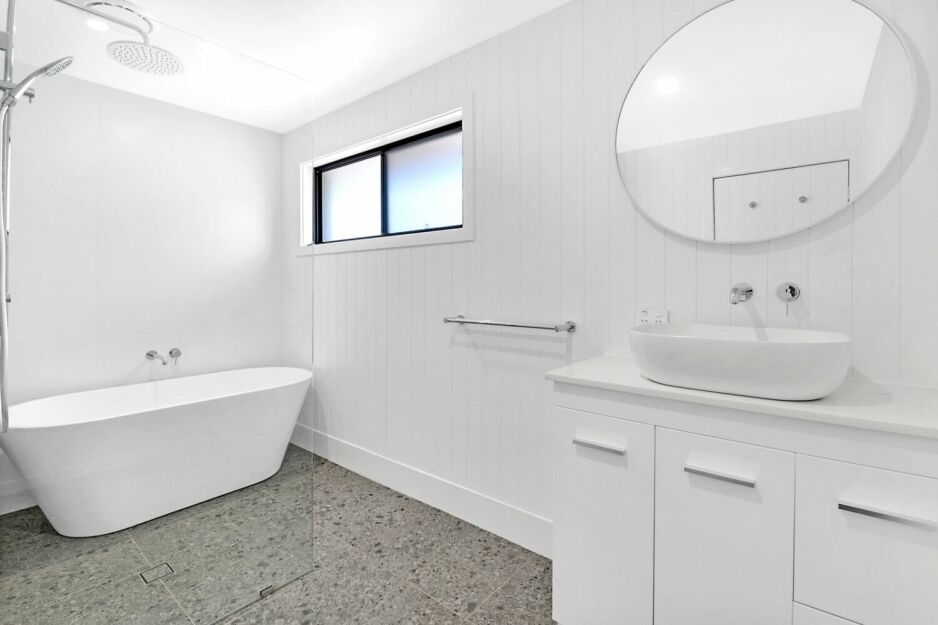
Not Being Present When the Bathroom Mirror Was Installed
I’m not a control freak, but after this blunder, I wish I was! Don’t expect apprentice builders to know a bathroom mirror should be centre-aligned with your tap and bathroom cabinet. I marked out every bathroom fitting with tape to show precisely where the accessories went, but the mirror was a given, so I didn’t mark it out. I return an hour later, and my mirror is a good 200mm to the left of my vanity, in line with nothing. AND WORST OF ALL, IT IS SCREWED INTO TILE! This is not a minor mistake that is easily fixed. In fact, according to my tiler, it cannot be fixed and is still, to this day, off-centre. In my case, fixing the positioning would leave obvious holes in the tiles that the mirror wouldn’t cover in its correct position. To make matters worse, the bathroom walls are sheeted with Aqua Check plasterboard, and the tile is one of the 300×600 matt white wall tiles. My tiler feared that pulling off a tile of this size would likely bring the plasterboard with it, creating a much bigger headache. Had the walls been sheeted with fibre cement sheeting, I could have replaced the tile without damaging the walls.
So, how can you avoid this mistake? By making sure that you are present for the installation of your bathroom mirror. This will ensure that it is installed exactly where you want it. You should also communicate clearly with the installer about where your mirror needs to be placed and double-check measurements and alignment before the mirror is finally secured. Don’t just assume that it will be put in the right place; it’s your bathroom, and you should have full control over how it looks.
Choosing a Tiler Based on a Recommendation Without Seeing Their Work
I was in a bit of a pickle with my investment property. I had just bought it; the tenant moved in the day after settlement, and then a week later they told me the walls in the shower were moving. I knew there was some termite damage from the building report, but I had no idea the extent. Needless to say, I needed to do a complete bathroom renovation in Perth, pronto! Unfortunately, my amazing tiler has a 3-month waiting list, so getting him in immediately was out of the question. So I did what anyone needing a tiler would do: I asked friends and family for recommendations.
I learned from this that some people’s idea of a good tiler is VERY different from mine, or perhaps they have just never seen the work of a great tiler. Let’s say it was a bad experience from start to finish. Again, most people would say the tiling is good, but it’s a far cry from the high standards of my normal tiler. I knew my mistake was relying too heavily on recommendations and not taking my own precautions to ensure that I had a skilled and reliable tiler.
To avoid this mistake when choosing a tiler for your Perth bathroom renovation or any other job, you should take the time to evaluate their work before making a decision. Ask for portfolios or samples of previous work to get an idea of their style and quality. Also, seeking multiple quotes and comparing experiences is a good idea. Your tiler must understand what products you need for your bathroom renovation project, as many variations in quality and style are available. You should also ensure that the tiler you choose is licenced and insured so you will have some recourse in case of any mishaps during the installation process.
My Finished Bathroom Renovations


Although it may seem like my bathrooms turned out dreadfully, they really didn’t. As you can see from the photos from my most recent renovation below, even with the mistakes, both bathrooms look amazing (professional photography also helps!), and no one else will notice most of these issues. But if I were to do it all over again, these are the five things I would certainly do differently.
Want to match my look? Find the products used below:
-

 Price range: $120.00 through $200.00 inc.GSTSelect options This product has multiple variants. The options may be chosen on the product page
 - $25.00 / m2

-

-
-
")
-

-

Whether you’re doing a full bathroom renovation or just replacing some of your bathroom products, I hope that my experience has shed some light on the importance of double-checking measurements, ensuring walls are square, and being present during crucial installations. The most important takeaway from this is that, with a bit of preparation and attention to detail, you can avoid common bathroom renovation mistakes and achieve a professional finish.
No matter how small or large your bathroom renovation project is, if you keep my experience in mind, you can avoid common bathroom renovation mistakes, save time and money, and ensure your renovation succeeds. If you have questions about bathroom renovations or products for your project, don’t hesitate to contact us at Ross’s Discount Home Centre. We are always happy to help!
Conclusion
Renovating a bathroom can be a rewarding yet challenging process, especially here in Perth. As my own experiences have shown, taking the time to research and plan is essential to avoid common pitfalls. From choosing moisture-resistant materials to calculating the right amount of tiles, these steps are key to ensuring your renovation runs smoothly and looks flawless upon completion.
The main takeaway is that bathroom renovations, whether in Perth or anywhere else, can involve a lot of small details that are easy to overlook. With the right preparation and quality bathroom products, however, you can navigate the process more confidently. For further advice, check out 9 Things to Consider Before Renovating Your Bathroom—it covers essential tips that can help set you up for success.
Additionally, if you’re about to dive into a bathroom renovation, our Guide to Perth Bathroom Renovations offers valuable insights to help you avoid some of the mistakes I encountered. With a bit of planning and the right guidance, you’ll be well on your way to creating the bathroom of your dreams.
Enjoy the process, and best of luck with your renovation!