
How To Install Quarter Turn Taps & Wall Assemblies
Ready to upgrade your taps to something more modern and functional? Quarter-turn taps are a great choice for any home, offering convenience and a sleek look. And the good news is—you don’t need to be a seasoned plumber to install them yourself! With a few tools and some simple steps, you can get the job done in no time. Here’s how to install quarter-turn taps and give your bathroom or kitchen a fresh, updated feel.
Tools You’ll Need
Before you dive into the installation, grab these tools:
- Two adjustable spanners
- A pair of pliers (pointed nose works best)
- The supplied Allen key that comes with your taps
Got everything? Let’s get started!
Step 1: Remove Your Old Taps
First things first—turn off the water supply. You don’t want water spraying everywhere! Once the water is off, drain any remaining water from the pipes by opening the lowest hot and cold outlets in your home. For most people, this will be the taps in the bathtub.
Now, it’s time to say goodbye to your old taps. Remove the handle, flange, and spindle, and make sure you also take out the old fiber washer and any worn tap components. If the old tap parts are stuck or swollen, don’t panic—grab your pointed nose pliers to help ease them out.
Step 2: Prepare Your New Quarter Turn Taps
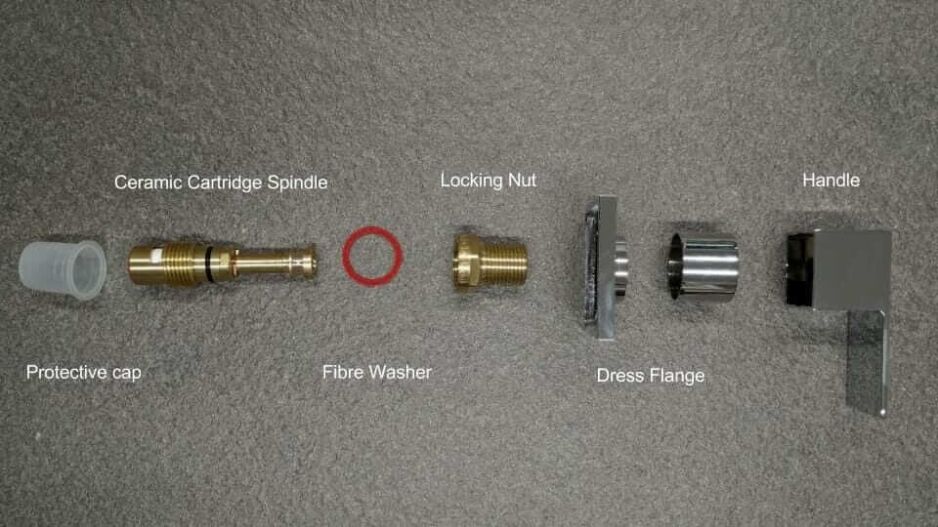
Now that the old taps are out of the way, it’s time to prepare your shiny new quarter-turn taps for installation. Open the box and lay out all the included parts. First, disassemble the taps by removing the handle with your Allen key, then unscrew the dress flange.
Here’s an important part of the process: you need to separate the locking nut from the ceramic cartridge spindle. This is crucial for ensuring the cartridge seals properly against your existing tap assembly. Double-check that you’ve done this before moving on to the next step.
Step 3: Install the New Ceramic Cartridge
With your parts prepared, it’s time to install the new ceramic cartridge. Screw it in by hand until it reaches the tap seat, then gently tighten it with a spanner. No need to go Hulk-mode here—just tighten it enough to seal it properly, like you would when turning off a tap.
Once the cartridge is in place, pop on the new fiber washer and tighten the locking nut firmly with your spanner.
Step 4: Reassemble the Taps
Next, screw the dress flange onto the locking nut. This doesn’t need to be overly tight—just hand-tighten it. After that, position the handle in your desired orientation and secure it using the Allen key.
Step 5: Turn the Water Back On and Check for Leaks
Now that your quarter-turn taps are in place, it’s time to turn the water supply back on. Slowly open the taps and keep an eye out for any leaks. If everything’s dry and functioning properly, give yourself a pat on the back—you’ve just installed your new quarter-turn taps!
Conclusion
And there you have it! Installing quarter-turn taps is a simple DIY project that can instantly upgrade the look and functionality of your bathroom or kitchen. With just a few tools and these easy steps, you’re all set to enjoy your new taps. If you’re thinking about making more improvements or need new tapware, why not check out the fantastic range at Ross’s Discount Home Centre in Perth? We offer a wide selection of stylish, high-quality taps at unbeatable prices. Visit us today and find the perfect tapware for your next project!