
How to Install Bathroom Tiles
Tiling a bathroom is one of the most transformative steps in a renovation, but it’s also one of the most intricate. From proper preparation to meticulous installation, learning how to tile a bathroom requires careful attention to detail to achieve a professional-quality finish. At Ross’s Discount Home Centre, we’ve gone the extra mile to bring you this comprehensive guide, featuring insights from our very own Matt—an experienced professional tiler with years of expertise before joining our team.
Before you jump into the installation process, it’s essential to prep a bathroom for tiling thoroughly. This includes crucial steps like waterproofing and ensuring the surfaces are ready for tiles. Without proper preparation, even the most beautiful tiles won’t stand the test of time. That’s why Matt’s expertise has been invaluable in crafting this guide—to help you get every step right.
In this article, we’ll walk you through how to install bathroom tiles, from waterproofing to the setout and laying tiles with precision. Whether you’re aiming for a sleek modern look or a timeless design, our professional tips will ensure your bathroom renovation is both stunning and durable. With decades of experience helping Perth homeowners, and with Matt’s tiling know-how, you can trust this guide to deliver the expertise you need for success.
Make It water-tight
Presuming you have already sheeted the room with Water Resistant (WR) plasterboard and laid 8mm fibro sheeting to the floor, the first step is to make the floors and wet area water-tight by applying a waterproof membrane.
But before you can apply the membrane to the area, you need to prime it first. For this, we used this versatile Primer, which is just $12.00 for 1 litre or $28 for 5 litres. Once you have applied the primer and it is dry, you can then apply the waterproof membrane.
If you have an enclosed shower, you will need to apply the membrane to all walls of the shower. If you have a bath and shower, apply the membrane to all walls of the area, and so on. We used this waterproof membrane on my bathrooms, which we stock for just $60.00 – $190.00 a bucket.
If you take a look at the photo below, which is from my main bathroom, you will see the blue waterproofing membrane covers the floor entirely and also completely covers my wet area, which will house my bath and walk-in shower.

Be sure to apply the waterproof membrane to the floor and the walls of the wet areas liberally to cover all sight of the WR plasterboard.
Lay the screed
The next step in how to install bathroom tiles is to lay the screed. Screed is the cement bed that sits on top of the waterproofing membrane, in which you install the floor tiles over.
There is a definite art to this process. It isn’t a case of just throwing down some cement and letting it dry. It’s all about fall—meaning, the angle of the fall that the water will naturally flow to for drainage.
The popularity of modern walk-in showers, which use only a shower panel, means this process is more important than ever. Without an enclosed screen to capture the water and funnel it to the drain, walk-in showers, more than anything else, are dependent on the fall to lead the water to the drain. Furthermore, the increasing popularity of channel drains means even more thought has to be taken in this process.
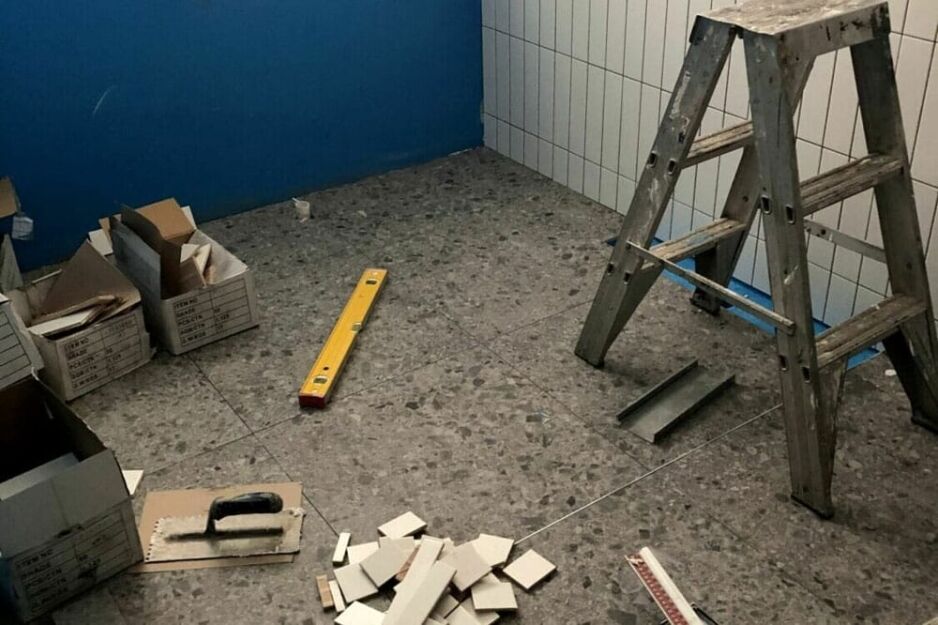
If you look at the photo below, which again is of my bathroom, you will see the area behind the yellow level falls downwards towards the right wall. Where the wood lies against the right wall is where my channel drain will be. Therefore, the downward fall to the wood means water from my shower will run back to the drain, which is what you want it to do.
When laying the screed, you need to be mindful to make it thick enough to give you the amount of fall you need. Usually, in a standard bathroom with an enclosed shower and floor waste, you would only need a slight fall, so the screed would be around 20mm deep. However, with my walk-in shower and channel waste, a more significant fall is necessary; therefore, the total height of my screen is 40mm.
Do the setout
Don’t overlook the importance of the setout! This is one of the steps that will elevate your DIY tiling to give it the professional look I know you will want.
First of all, let me start by explaining what the setout is because I didn’t know about this until my tiller came, and chances are you don’t either. The setout is the process of determining where you lay your tiles to prove the best finish. By this, I mean, where the grout lines will be.
The best way to explain this is by giving you another example. The picture below is of my ensuite bathroom, which is long and narrow. You can see that the setout of the Terrazzo Grey floor tile and 60cmx30cm matt white wall tile strategically places a full tile in the centre to create symmetrical vertical lines. Had the tiler started with a full tile from the wall, it would look much different. You would have two full-size tiles and then a tiny sliver of a tile to fill the excess gap. Conscious tile placement decisions, such as the above, are what the setout process is all about — and they help you avoid one of the most common tile layout mistakes in any DIY job

Start with the floor
When the setout is sorted, you are now ready to install bathroom tiles. Start with the floor. Follow the setout and use a laser level as your guide. Start at the end of the room and work your way backwards, towards the door. Apply the tile adhesive liberally with a notched trowel, ensuring the entire surface area under the time is covered. Work in your immediate area only and apply the adhesive as you go.
For the tile adhesive, we used Uni-Grip Tile Adhesive, which is $34.00 a bag.
As you will see in the photo below, my tiler used the Clip-It levelling system to achieve a quick and seamless installation. I recommend you check these out, as it ensures a professional finish. You can get them from ClickTile also.
The clip system works by locking down a tile in line with the previous tile, so they are all level with one another. There will be no raised edges that will be prone to chipping, and you’re sure to get a much cleaner, more professional-looking result.

Tile the Walls
Once you have installed bathroom floor tiles, you can then move onto the walls. You will want to repeat the setout process for the walls to ensure the cuts and grout lines are best positioned to the wall and adjoining tiles.
For large white bathroom wall tiles, such as the 60cmx30cm matt white wall tile that I used, you use the clip-it living system to ensure a seamless finish. For feature tiles such as subway tiles, you will want to carefully install these by hand without relying on any clip system.
Pro-tip: If you have small tiles on a feature wall, subway tiles, or otherwise, have your plasterer finish the wall as if it were being painted; i.e., set the joins and sand it back. Having a smooth surface to install small feature tiles on will prevent them from buckling and becoming uneven on joins.
Shop for wall tiles Shop for feature tiles
Detailing Counts
It’s all in the details, so they say! Detailing is one step of the tile installation process that many professional tiles don’t bother to do, but again, it makes all the difference.
Detailing is simply the process of going over every tile with a small pointing trowel tool, picking out excess tile adhesive from the joints before grouting.
This process will ensure the grout will fill the joints better and provide a smoother finish. It may be tedious and time-consuming, but it all goes towards a better, more professional-looking job.
Grout
Finally, we come to the grouting. This is a straightforward process, but you want to consider the grout colour you use. You will want to match it to your tiles for a seamless finish. Our article on choosing the right grout colours provides additional advice if you’re unsure.
We used Kemgrout Coloured Grout in Ultra White on the walls and Misty Grey on the floors. This grout comes in 11 colours, so you’re sure to find one to match your tiles.
Apply the grout in a circular motion with force, pushing it into the joint as you go. Ensure all joints have enough grout and leave the grout to set for 24 hours, with no walking, etc. on the tiles over this period.
Finishing Touches
Your bathroom tile installation is complete with a little washover and sealer. After allowing 24-hours for the grout to set, its time to give it a good clean.
We used Muck Off. It’s an excellent commercial-grade tile cleaner that will remove any grout or adhesive residue from your tile, leaving it sparkling clean and ready for you.
With the tiles sparkling clean, the only thing left to do now is to seal the room with sealant. Go around all door frames and window architraves with a matching sealant to ensure the bathroom is water-tight. If you have tiled to the ceiling, you will also want to run the sealant around the cleaning. It also pays to match the sealant to your tiles. For example, my tiler used a grey sealant around my floors and a white sealant around my ceiling, walls, and architraves.
You may want to get a professional Chalker in to do this if you are not confident, as finishing touches such as this make all the difference.
Conclusion
If you’ve been wondering how to install bathroom tiles, this article provides a complete step-by-step guide to help you achieve a professional finish. We’ve covered every aspect of the process, from the essential prep for tiling, such as waterproofing, priming, and screeding, to laying tiles on the floors and walls and perfecting those all-important finishing details.
Thanks to Matt, our resident expert and former professional tiler, this guide is packed with practical advice and insider tips that make even the most complex steps manageable. With his years of experience, you can feel confident in tackling your tiling project like a pro while staying on budget.
To make the process even easier, Ross’s Discount Home Centre has everything you need for a successful tiling project. From feature tiles and waterproofing membranes to primers, adhesives, and accessories, you’ll find it all in our extensive range. Visit us in-store or shop online to get high-quality tiles and tiling products at competitive prices. Plus, our knowledgeable team, including Matt, is always on hand to assist you with any questions or advice.
With this guide and the right materials, you’re well on your way to transforming your bathroom into a stunning and functional space. Let’s get tiling!