
How To Install A Walk-In Shower Panel
A walk-in panel looks simple, but how to install a fixed glass shower panel properly comes down to the setup before the glass goes in. This guide is for Ross’s shower panels that use a fixed glass panel in a walk-in shower. It is not for shower doors, sliding screens, wet wall panels or full shower enclosures.
I see this a lot at Ross’s. Customers choose walk-in panels because they like the clean, open look. Then the next question is usually about how the panel is held, where it fixes and what needs checking before DIY installation.
That is the right way to think about walk-in shower panel installation. A fixed panel is one of the cleaner shower screen styles to fit when the bathroom is suitable, but the result depends on straight marking, sound fixing points, careful glass handling and following the product instructions supplied with the panel.
What Type Of Shower Panel Does This Guide Cover?
A shower panel can mean a few different things online, so I want to clear that up early. In this Ross’s guide, a shower panel means a fixed glass shower panel used in a walk-in shower.
This guide covers a single fixed panel that creates an open shower entry. The glass does not swing like a shower door. It does not slide like a sliding shower screen. It is also different from a bath screen, a full shower enclosure or a wall panel used instead of tiles.
That matters because shower panel installation is much simpler to understand when you know what product you are working with. A walk-in shower panel relies on the correct fixing system, straight placement and proper support. It is not installed the same way as a hinged door or sliding screen.
If you are fitting a door, replacing a full screen, installing a bath screen or working with another shower screen style, our broader shower screen installation guide is the better place to start. This article stays focused on Ross’s fixed glass walk-in panels and how to prepare for that specific install.
Before You Start Installing Your Walk-In Shower Panel
The best result starts before any holes are drilled. Before you start installing a glass shower panel, check the bathroom as carefully as you check the panel itself.
That is the advice I give customers who ask how to install a fixed glass shower panel at home. Ross’s walk-in panels are made for DIY installation, but the bathroom still needs to be ready for one. A fixed panel needs sound fixing points, clean tile edges, suitable waterproofing, the right floor fall and enough entry space to work properly.
Read the product guide before you start. Lay out the parts on a soft surface and check them against the instructions. Your panel may use a wall channel, brackets, a support arm or another fixing method. Do not assume every walk-in panel goes together the same way.
You also need two people for the glass lift. Safety glass is strong once installed, but the edges still need careful handling while the panel is moved, positioned and seated.
Also check where the panel will finish in the room. A fixed panel needs enough width to control splash, but it also needs enough open space for comfortable entry. If the bathroom is compact, measure the clear entry as well as the glass position before you commit to the panel size.
| Usually Good For DIY | Check First Or Get Help |
| Straight tiled walls with solid fixing points | Loose, cracked or drummy tiles |
| Product instructions and all supplied parts are clear | Missing instructions or parts you cannot identify |
| Waterproofing has already been completed correctly | You are unsure what sits behind the tiles |
| Floor fall sends water back into the shower area | Water runs out through the entry area |
| Two people can lift and position the panel safely | You would need to lift the glass alone |
| You have experience drilling slowly into tile | You have never drilled into tiles before |
| There is room to manoeuvre the panel | Tight bathrooms with awkward access |
If anything looks off, stop before drilling. It is easier to sort out a fixing, tile or layout problem before the glass is lifted into position.
Tools And Parts You’ll Need For Shower Panel Installation
Glass shower panel installation is much easier when everything is ready before the panel comes out of the packaging. I always recommend laying out the supplied parts first, then matching them against the product instructions before you start marking the wall.
The exact parts will depend on the walk-in shower panel you have bought. Some panels may use a wall channel. Some may use brackets. Some may include a support arm. Follow the parts supplied with your product, not a generic online list.
You will usually need:
- Supplied product instructions
- Supplied fixings, wall channel, brackets or support arm, where included with your panel
- Tape measure
- Pencil or marker suitable for tile
- Spirit level
- Drill
- Tile drill bit
- Screwdriver or driver bit
- Masking tape for marking and protecting tile edges
- Soft packing or a blanket to rest parts on
- Bathroom-grade silicone
- Caulking gun
- Clean cloths for wiping excess silicone
- Two people to lift and position the glass
Check the instructions before buying extra fixings or silicone. If the product guide names a specific fixing method, sealant type or drill size, use that as the starting point. The goal is not to make the panel fit your preferred method. The goal is to install the panel the way it was made to be installed.
Once the tools and parts are ready, the next job is to slow down and work through the install in order.
How To Install A Walk-In Shower Panel Step By Step
The supplied Ross’s product instructions come first. The steps below are a general guide to help you understand how to install a fixed glass shower panel, but your product guide decides the exact fixing method, sealant placement and parts used.
- Read the instructions before you unpack the glass.
Check the full guide first, then confirm every supplied part is there. Look for the wall channel, brackets, support arm, plugs, screws, seals or setting blocks listed for your panel. Put everything on a soft surface so nothing gets scratched. - Measure the shower area.
Measure the opening and the panel position more than once. Check the panel width, entry space and where water will fall once the shower is running. A walk-in panel needs enough room for access as well as splash control. - Check the wall and floor with a spirit level.
Place the level against the wall where the panel will fix. Check the tiled floor or shower base as well. Small variations are common, but you need to know what you are working with before you mark fixing points. - Dry fit the channel or brackets.
Hold the wall channel or brackets in position before drilling. This helps you check height, alignment and panel location. Mark the fixing points only when the position is right. - Mark clearly and drill slowly.
Use masking tape where you need to mark tiles. Drill into tile slowly with the correct tile drill bit. Do not rush this step. Slow drilling helps reduce tile damage and gives you better control. - Fit the supplied plugs, channel or brackets.
Install the fixing parts supplied with your shower panel. Tighten screws carefully. The fittings need to hold firm, but overtightening can damage tiles, plugs or hardware. - Position any floor support or setting blocks.
If your instructions include floor support, a floor channel or setting blocks, place them exactly where the guide shows. These parts help the glass sit correctly and protect the glass edge. - Lift the glass into position with two people.
This is not a one-person job. Lift the panel upright, keep the edges protected and place it into the channel or brackets as instructed. Move slowly and avoid resting the glass edge on hard tile. - Check the panel alignment.
Once the panel is seated, check it with the spirit level again. It should be straight, stable and sitting where the guide shows. Make small adjustments before final tightening. - Fit the support arm if supplied.
Some walk-in shower panels use a support arm or brace. Fit it only where the instructions show. The arm should support the panel without pulling it out of alignment. - Tighten carefully and apply silicone where instructed.
Tighten the hardware in stages. Apply bathroom-grade silicone only to the edges named in the product guide. Do not use silicone as the main support for the glass. - Let the silicone cure before using the shower.
Follow the cure time on the silicone or product instructions. The panel should feel stable, straight and properly supported before anyone uses the shower.
A good walk-in panel install should feel calm and controlled, not rushed. Measure carefully, check each fixing point and let the supplied instructions lead the job.
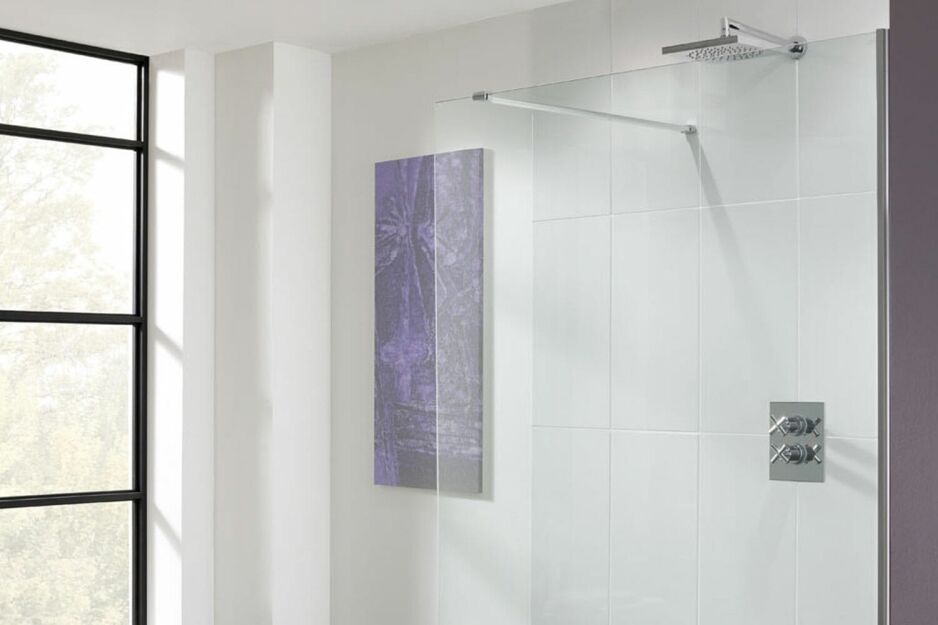
How The Support Arm, Brackets And Channel Hold The Panel
A fixed panel does not stay upright because of silicone alone. In fixed glass shower panel installation, the glass is held by the full support system that comes with the product. That may include a wall channel, fixing brackets, floor support, a support arm or a mix of these parts.
- Wall Channel Or Brackets. The wall fixing gives the panel its main vertical support. A channel grips the panel along the wall side, while brackets fix the glass at set points. The right method depends on the panel design and the supplied instructions.
- Floor Support. Some panels use a floor channel, setting blocks or other floor support. These parts help carry the glass correctly and keep the bottom edge protected. They also help the panel sit where it needs to sit.
- Support Arm Or Brace. A support arm can reduce movement in wider panels. It is usually fixed from the top of the glass back to the wall. This helps keep the panel steady without turning the walk-in shower into a full enclosure.
- Silicone. Silicone seals the edges named in the instructions. It helps with water control, but it should never be treated as the main support. If a panel relies only on silicone to stay in place, something has gone wrong.
- Panel Size. Larger panels need more thought before you buy. I often see customers choose a wide panel because they want better splash control, then realise the support system and fixing points matter just as much as the glass width. That is why single panel shower screen installation starts with choosing the right panel for the room, not just the largest one that fits.
For a broader look at glass screen styles, you can also compare our frameless shower screens. AGWA also has useful guidance on unframed shower screens if you want more background on how unframed glass systems are supported.
How To Seal A Walk-In Shower Panel
Sealing a walk-in shower panel should always follow the supplied product instructions. Different shower panel designs can use different sealing points, so do not assume every edge gets silicone.
Many shower panel systems are sealed only where the guide specifies. That may be along the outside edge, the wall channel, the floor line or another nominated point. Good shower panel installation is as much about sealing the right edges as it is about fixing the glass straight. The instructions matter because sealing the wrong area can trap water, affect drainage or make the finished shower harder to clean.
Use bathroom-grade silicone and apply a neat bead rather than a heavy one. A thick, messy bead will not make the panel stronger. It only makes the finish look rough and harder to wipe down later. Smooth the silicone while it is workable, clean up excess straight away and avoid moving the panel once the sealant is in place.
Let the silicone cure for the time shown on the product or silicone instructions before using the shower. I know it is tempting to test the shower straight away, especially at the end of a renovation, but the seal needs time to do its job.
Perth’s hard water can also leave marks on glass and silicone over time. Once the shower is in use, a quick wipe-down after showering helps keep the glass clearer and the sealed edges easier to maintain.
Common Walk-In Shower Panel Installation Mistakes
Most walk-in panel problems start with small shortcuts. The glass might still go in, but the finished shower can feel loose, sit out of line or let more water escape than it should.
- Measuring From One Point Only: Shower walls and floors are not always perfectly straight. Measure the panel position in more than one place so you are not working from a single lucky measurement.
- Skipping The Dry Fit: A dry fit shows you whether the channel, brackets and panel position make sense before you drill. It is one of the easiest ways to catch a problem early.
- Drilling Into Weak Tiles: Loose, cracked or drummy tiles are not a sound fixing point. If the tile moves, the fixing can move with it, and that can affect the whole panel.
- Forcing Fixings: Screws and plugs need to hold firm, but forcing them can crack tiles or damage the hardware. Tighten carefully and follow the product instructions.
- Resting Glass On Hard Surfaces: The flat face of safety glass is strong, but the edges need care during handling. Always rest the panel on soft packing, not directly on tile or concrete.
- Using Silicone As The Main Support: Silicone is a sealant, not the structure. A fixed panel should be held by the supplied fixing system, with silicone used only where instructed.
- Using The Shower Too Soon: Silicone needs time to cure before the shower is used. Turning the water on too early can weaken the seal before it has done its job.
- Buying Before Checking The Space: I often see customers focus on the glass width first, then ask about splash control and entry space after. The better approach is to check the shower area first, then choose the panel that suits it.
If you are working out how to fit a glass shower panel, take your time before anything is fixed in place. A few extra checks at the start can save a lot of frustration later.
Can You Install A Walk-In Shower Panel On A Shower Base Or Tiles?
A walk-in shower panel can be installed on some shower bases and some tiled shower floors. The right answer depends on the panel design, the base or floor set-up, the fixing points and the product instructions.
On a tiled shower floor, check the floor fall before choosing the panel position. Water should run back into the shower area, not out through the open entry. You also need a fixing method that suits the tile surface and the wall beside it. If the tiles are uneven near the panel line, sort that out before the glass is fitted.
On a shower base, check the base edge and the panel instructions carefully. Some bases have a flat edge that suits a screen or panel. Others may have curves, lips or shapes that affect where the glass can sit. The panel still needs to be fixed and supported correctly, not just placed where it looks right. Also check that the base directs water back to the waste, especially near the open entry side.
Panel width also matters. A wider panel can help with splash control, but it can also affect entry space and the support system needed. A narrower panel may suit a compact room, but only if the shower layout still controls water properly.
If you are choosing before you install, compare our walk-in shower panels with your shower base, tiled floor, wall position and entry width in mind. It is much easier to match the panel to the bathroom now than to deal with poor splash control or awkward access after installation.
Frequently Asked Questions
Can I Install A Walk-In Shower Panel Myself?
Yes, a confident DIY renovator can install a walk-in shower panel when the panel is made for DIY installation, the bathroom is suitable and the product instructions are followed. That is also the best way to approach how to install a fixed glass shower panel at home. The main checks are sound fixing points, straight placement, safe glass handling and a two-person lift.
What Holds A Fixed Glass Shower Panel In Place?
The supplied fixing system holds a fixed glass shower panel in place. Depending on the product design, that system may include a wall channel, brackets, floor support, a support arm and silicone where the guide specifies it. Fixed glass shower panel installation should never rely on silicone alone as the main support.
Does A Walk-In Shower Panel Need A Support Arm?
Some walk-in shower panels need a support arm, and some do not. The answer depends on the panel size, glass design and fixing system supplied with the product. Always follow the product instructions, because adding, removing or moving a support arm can affect how the panel is held.
Do You Silicone The Inside Or Outside Of A Shower Panel?
Silicone placement on a shower panel depends on the supplied product guide. Many shower screen systems are sealed only where the instructions specify, which may be the outside edge, wall channel or floor line. Avoid sealing every edge by habit, because the wrong placement can affect drainage and cleaning.
How Long Before You Can Use The Shower After Installing A Panel?
A shower should not be used after installing a panel until the silicone has cured according to the product or silicone instructions. Cure time can vary between products and sealants, so follow the guide on the packaging. Using the shower too early can weaken the seal before it is ready.
Is A Fixed Glass Shower Panel The Same As A Shower Door?
A fixed glass shower panel is not the same as a shower door. A fixed panel stays in place and creates open access to a walk-in shower, while a door swings or slides to open and close the entry. For door-style screens, use our broader shower screen installation guide.
Which Walk-In Shower Panel Should You Choose Before Installing?
The right walk-in panel is the one that suits the bathroom layout, fixing points and the way the shower will be used. Check the wall condition, shower opening, panel width, fixing method, support system and splash control before choosing the glass.
A panel that looks right online still needs to suit the shower base or tiled floor, the wall fixing points and the entry space. A quick measure across the opening, plus a check of where water will fall, will tell you more than the product image alone.
For most Perth bathrooms, the decision comes down to three questions. Is the fixing point sound? Is the panel wide enough to control splash without making entry awkward? Does the supplied support system suit the room? If the answer is yes, planning the installation becomes much easier.
Ross’s is supply-only, so our job is to help you choose the right product and understand what to check before installation. Compare our walk-in shower panels online, or visit our Guildford showroom to check sizes, support details and panel styles before you buy. Perth Metro delivery is available if you want the panel delivered to site.