
How To Remove a Vanity Unity
As Perth’s leading bathroom renovation experts at Ross’s Discount Home Centre, we’ve helped thousands of homeowners learn how to remove a bathroom vanity safely and efficiently. With over 30 years of experience in bathroom renovations, we understand that learning how to remove bathroom vanity can seem daunting at first. Whether you’re planning to replace bathroom cabinets or simply removing a vanity from your bathroom as part of a larger renovation, this comprehensive guide will walk you through the process step by step.
Before we dive into how to replace a bathroom vanity, it’s important to note that changing bathroom cabinets requires careful attention to plumbing connections and proper tools. This guide provides professional insights from our certified plumbers and renovation specialists, ensuring you can tackle this DIY project confidently and safely.
Step 1: Turn Off the Water Supply and Prepare the Workspace
Before you begin removing your bathroom vanity, proper preparation ensures a safe and efficient process. At Ross’s Discount Home Centre, our plumbing experts recommend following these essential preparation steps:
Locate and Shut Off Water Supply
- Find your main water valve (typically located near your water meter)
- Turn the valve clockwise to stop water flow
- Test bathroom taps to confirm water shutdown
- Open other house taps to release remaining pressure
Pro Tip: We recommend taking a photo of your existing plumbing configuration before disconnecting anything. This reference will prove invaluable when installing your new vanity.
Prepare Your Workspace
- Remove all items from inside your bathroom vanity cabinet
- Clear a 3-foot workspace around your vanity
- Lay down drop sheets to protect your bathroom floor
- Position a bucket under the P-trap to catch residual water
Gather Essential Tools
You’ll need:
- Adjustable wrench
- Phillips head screwdriver
- Utility knife
- Bucket
- Drop sheets
- Safety gear (gloves, safety glasses)
Safety First
Our certified installers always emphasise these safety measures:
- Ensure proper ventilation in your bathroom
- Wear protective eyewear and gloves
- Keep a first-aid kit nearby
- Store tools away from wet areas
- Use non-slip mats around your workspace
Safety Note: If you notice any mould, asbestos, or electrical issues while preparing to remove your bathroom cabinet, stop immediately and contact a licenced professional.
Step 2: Remove the Vanity Doors and Interior Fixtures

Start by removing the vanity doors and interior components. This step not only helps make the workspace more accessible but also prevents damage to the vanity or its fixtures during removal.
Detaching Your Vanity Doors
Before changing bathroom cabinets, you’ll need to carefully remove the doors. Modern units typically use clip-on hinges with a quick-release mechanism. You’ll find a small button or lever at the back of each hinge; press this firmly and the door should detach smoothly. For older bathroom vanities, you’ll need to unscrew the hinges completely. Always support the door’s weight while removing the final screws to prevent damage or injury.
Clear Interior Components
Proper organisation is crucial when removing a bathroom vanity. Begin by taking clear photos of your vanity’s interior configuration; this reference will prove invaluable during reassembly. Remove all drawers by extending them fully and locating the release mechanisms on the slides. Most modern vanities feature quick-release tabs on both sides of each drawer.
Essential items to remove and organise:
- Drawers and sliding mechanisms
- Adjustable shelving and brackets
- Door hinges and associated hardware
- Internal storage accessories
Create a Clear Workspace
After removing all components from your old vanity, inspect the frame thoroughly for any remaining brackets or hardware. Pay special attention to the areas around plumbing access points; older vanities often have additional support pieces that need removal. Store all hardware in clearly labelled bags to make reassembly straightforward.
Pro Tip: If you’re planning on changing bathroom cabinets entirely, take this opportunity to measure and inspect your plumbing layout. This information will help ensure your new vanity fits perfectly.
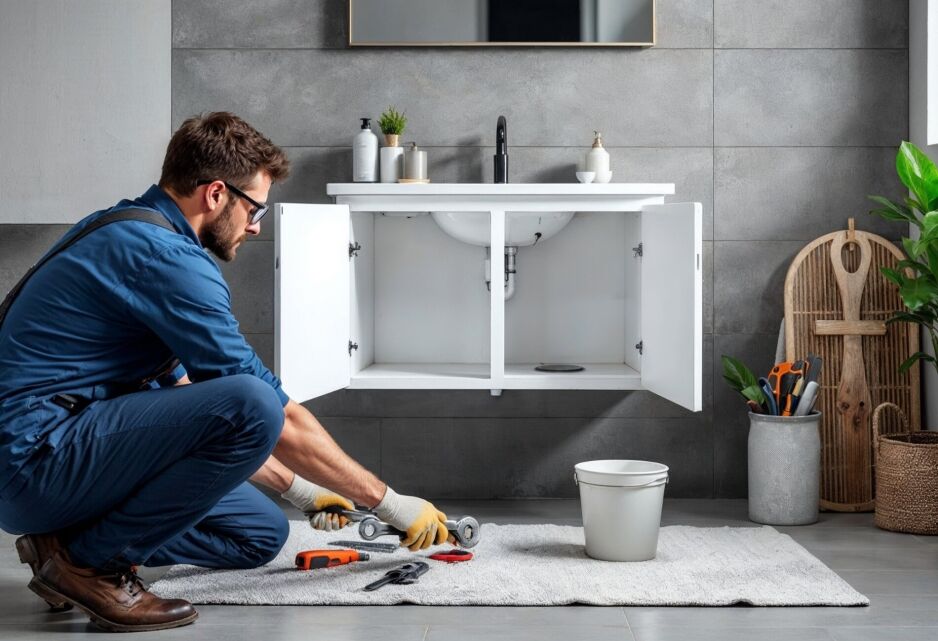
Step 3: Disconnect and Remove the Waste Pipe
Proper waste pipe disconnection is crucial when figuring out how to replace bathroom cabinets. This step requires careful attention to prevent water damage and ensure a clean removal. The main component you’ll work with is the waste trap (P-trap), which sits beneath your vanity sink and prevents sewer gases from entering your bathroom.
Safe Waste Pipe Disconnection
Before you start removing your bathroom vanity plumbing, position a bucket directly under the P-trap; there will be residual water inside. Using an adjustable wrench, carefully loosen the connectors securing the waste trap to the pipes. Turn them anticlockwise until the waste pipe comes loose. If you encounter significant resistance, don’t force it; this could damage your home’s plumbing infrastructure.
Pro Tip: When replacing bathroom cabinets, take photos of your plumbing configuration before disconnection. This documentation ensures accurate reassembly later.
Dealing with Stubborn Connections
Sometimes when changing bathroom cabinets, you’ll encounter corroded or seized connections. If gentle pressure with your wrench doesn’t free the waste pipe, you may need to cut it. Use a hacksaw or pipe cutter to make a clean cut as close to the wall as possible, while leaving enough length for future connections. Always wear appropriate protective gear during this process, including safety glasses and heavy-duty gloves.
Water Management
Keep your waste pipe removal area clean by immediately wiping up any water spillage. This not only protects your floor but also creates a safer working environment. If you notice any unusual odours or significant corrosion while removing the waste pipe, this might indicate larger plumbing issues that require professional attention.
Step 4: Disconnect and Cap the Water Supply Pipes
When learning how to remove vanity from a bathroom, proper disconnection of water supply lines is critical. As Perth’s bathroom renovation experts, we know that mishandling these connections can lead to serious water damage. You’ll need to work with both hot and cold water supply lines, which are typically located within your bathroom cabinet near the back wall.
Disconnecting Supply Lines
Before you remove a bathroom vanity, carefully disconnect the flexible water supply hoses from their shut-off valves. Use an adjustable wrench to loosen the connecting nuts, turning them anticlockwise. Keep steady pressure on the valve while loosening to prevent damage to the plumbing within your wall. If you’re struggling with tight connections, apply penetrating oil and wait 15 minutes before trying again.
Pro Safety Tip: Even with the water supply off, some residual water will remain in the pipes. Keep a towel handy and work slowly to minimise spillage.
Proper Line Capping
When changing bathroom cabinets, proper capping of water lines is essential. At Ross’s Discount Home Centre, we recommend:
- Clean each pipe thread thoroughly
- Apply fresh PTFE tape clockwise around each thread (3-4 wraps)
- Attach appropriate-sized caps to each line
- Hand-tighten caps before finishing with a quarter turn using your wrench
Label Everything
Before removing your bathroom vanity completely, clearly mark which line is hot and which is cold. This simple step saves significant time during installation of your new vanity. Use durable labels or coloured tape that won’t deteriorate if exposed to moisture.
Pro Tip: Take a photo or sketch the pipe layout before proceeding. If you’re unsure about any plumbing connections, ask your plumber for guidance.
Step 5: Detach the Vanity from the Wall and Floor
Understanding the attachment points is crucial when removing a bathroom vanity. Most vanities connect to both the wall and floor through a combination of screws, brackets, and adhesive sealant.
Breaking the Seal
Start by examining where your bathroom vanity meets the wall and floor. You’ll notice a bead of silicone sealant creating a waterproof barrier. Using a sharp utility knife, carefully score along these edges. Keep your blade at a 45-degree angle and work slowly; rushing this step often results in damaged wall surfaces that require costly repairs. If you encounter resistant areas, don’t force the blade; instead, use a silicone removal tool to gradually separate the seal.
Pro Tip: When removing a bathroom vanity, save a small section of the old silicone to help match the colour for your new installation.
Removing Mounting Hardware
After breaking the seal, locate and remove all mounting screws. You’ll typically find these:
- Along the back rail where the vanity meets the wall
- At the base near the floor
- Behind the kickboard (if present)
- Inside the cabinet at structural points
Final Detachment
Before completely removing your bathroom cabinet from the wall, check for any hidden fasteners or unexpected resistance. If your vanity seems stuck despite removing all visible attachments, gently rock it forward—sometimes old adhesive or forgotten screws can maintain a grip. Don’t force the unit free, as this could damage your wall cladding or floor tiles.
Safety Note: When changing bathroom cabinets, always have a second person assist with the final removal. Even small vanities can be surprisingly heavy once detached.
Step 6: Remove the Old Vanity
The next step in how to remove a bathroom vanity requires patience and careful handling. We know that this final extraction step can be tricky. With all connections loose, gently wiggle the unit to test for any remaining attachment points. The vanity should move slightly if all fasteners have been properly removed.
Lifting Technique
Your old vanity may be heavier than expected, especially if it’s made from solid timber or stone. Position yourself correctly—feet shoulder-width apart, back straight—and lift with your legs, not your back. If you’re unsure about safely removing the bathroom cabinet alone, don’t hesitate to ask for help. Most vanity units require two people for safe removal.
Pro Tip: Before lifting, check the path to your exit. Clear any obstacles and ensure you have enough space to manoeuvre through doorways.
Managing Disposal
Once you’ve successfully removed the vanity from your bathroom, consider your disposal options. Many vanity units can be:
- Donated to local renovation recyclers
- Listed on marketplace websites
- Taken to designated waste management facilities
- Broken down for material recycling
Environmental Note: At Ross’s, we’re committed to sustainable renovation practices. If your old vanity is in good condition, consider donating it to a local charity or renovation recycler.
Step 7: Assess and Repair the Wall and Floor if Necessary
After you’ve successfully removed the bathroom vanity, it’s crucial to properly assess and repair the exposed wall surface. It’s common to find water damage, mould, or deteriorated wall materials hidden behind old vanities. Check the wall thoroughly for:
- Signs of moisture damage or mould
- Holes from previous mountings
- Uneven surfaces
- Damaged tiles or grout
Surface Repairs
Before installing a new vanity, address any wall issues you’ve discovered. Start with a thorough cleaning of the exposed area, removing all old sealant and adhesive residue. For plasterboard repairs:
- Fill any holes with appropriate wall filler
- Allow the filler to dry completely
- Sand the area until it’s smooth and level with surrounding surfaces
Floor Preparation
When removing a vanity from your bathroom, you may find floor damage that needs attention, especially if you plan on installing a wall hung vanity. If you plan on installing a freestanding vanity, it may just cover any damage, so check to see if you can get away with it.
Repairing floor damage requires specific approaches depending on the type of flooring:
For tiled floors, check for any cracked or loose tiles where the vanity was mounted. Our renovation experts recommend repairing these issues before proceeding with a new installation. If you have vinyl or wooden flooring, fill any mounting holes with appropriate materials that match your existing floor.
Pro Tip: Take photos of any plumbing positions and measurements before covering them up with repairs. These references will be invaluable during your new vanity installation.
Step 8: Prepare for Your New Vanity Installation
Now that you’ve removed your bathroom vanity, it’s time to consider your replacement options. At Ross’s Discount Home Centre, we offer two popular vanity styles:
- Wall-hung vanities: Perfect for contemporary bathrooms, creating a floating effect that makes your space appear larger.
- Freestanding vanities: Traditional floor-mounted units offering maximum storage and stability.
Next Steps in Your Renovation Journey
The installation process will vary depending on your chosen vanity style. We’ve created detailed guides to help you complete your bathroom renovation:
- How to Install a Wall-Hung Vanity: Learn the specific mounting techniques and plumbing considerations for floating vanities.
- How to Install a Freestanding Vanity: Discover the step-by-step process for installing traditional floor-mounted vanity units.
Conclusion
At Ross’s Discount Home Centre, we understand that learning how to remove a bathroom vanity can seem daunting at first. However, by following this comprehensive guide, you can tackle this project with confidence. Remember that proper preparation, careful attention to plumbing connections, and patience during the removal process are key to success.
Taking time to properly remove your old vanity sets the foundation for successful bathroom renovations. Whether you’re planning to update your space with a modern vanity or completely redesign your bathroom, starting with a clean, well-prepared space is essential.