
Tile Splashback vs Glass Splashback: Which Is Better for Your Kitchen?
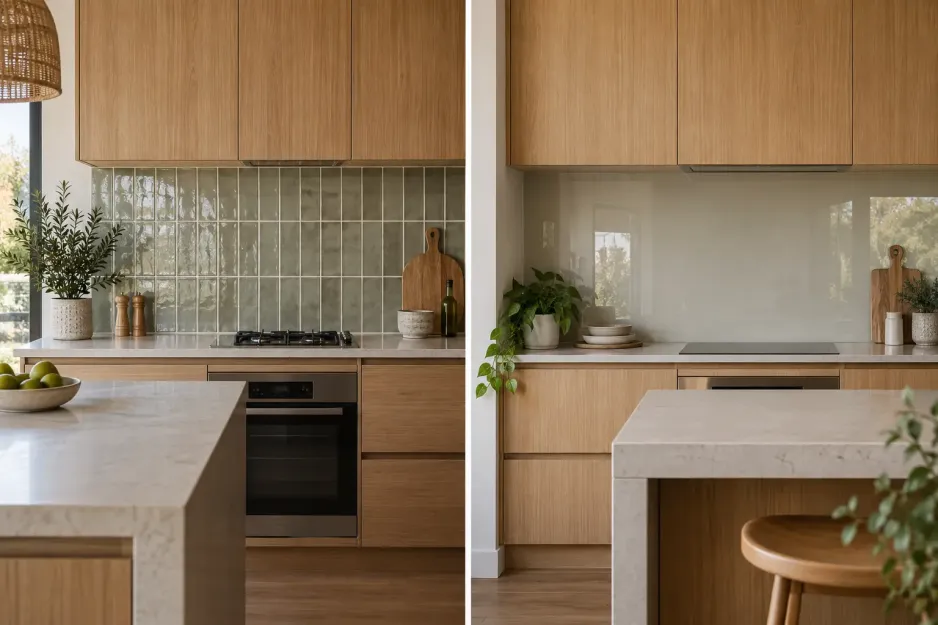
The glass vs tile splashback decision usually comes down to four things: cost, appearance, cleaning and how much flexibility you want during installation. Both options protect your kitchen walls and can look fantastic, but they suit different priorities.
Tile splashbacks are the better choice for most value-focused renovations because they generally cost less, offer far more design options and can be adjusted during installation. Glass creates a smooth surface without grout lines, but it usually costs more and requires specialist measuring, manufacture and installation.
I’ve helped plenty of Perth homeowners compare these options at our Guildford showroom. More than once, someone has arrived after receiving a glass quote and wanted to know whether tiles could create a similarly clean finish for less. In most cases, they could, especially with larger tiles and carefully chosen grout.
Ross’s sells splashback tiles, but we do not sell glass splashbacks. I’ll still compare both fairly so you can see where each performs well and make the right call for your kitchen. If you are considering more than these two options, our guide to other kitchen splashback materials covers the broader range.
Tile vs Glass Splashbacks at a Glance
If you’re choosing between a glass splashback or tiles, there is no single feature that settles the decision. Price matters, but so do cleaning, design choice, installation and what happens if you want to make changes later.
Here is the glass vs tile splashback comparison at a glance:
| Factor | Tile splashback | Glass splashback |
| Cost | Selected wall tiles at Ross’s start from around $30/m², supply-only | Basic glass material starts from around $200/m², while custom-measured glass commonly costs much more |
| Installation | Tiles can be cut and adjusted on site. Simple layouts may suit capable DIY renovators | Glass normally requires specialist measuring, manufacture and professional installation |
| Design | Wide choice of colours, shapes, sizes, textures and laying patterns | Smooth, continuous finish with no grout lines |
| Cleaning | Glazed tiles are easy to wipe, but grout may need extra attention | Easy to wipe across, but fingerprints, grease and streaks can be more noticeable |
| Repairs | A damaged tile may be replaced individually if a match is available | Damage may require specialist assessment or replacement of the panel |
| Best suited to | Value, design choice and future flexibility | A seamless contemporary finish with minimal joins |
For most value-conscious renovations, I believe tiles provide the better overall balance. Glass may still suit you if an uninterrupted surface is your main priority and you are comfortable with the added cost and specialist installation.
Tile vs Glass Splashback Cost

A tiled splashback is generally cheaper than glass, but the advertised square-metre prices do not always include the same things. To compare the kitchen splashback cost properly, check whether each figure covers the material alone or includes measuring, manufacture, cut-outs and installation.
How Much Does a Tile Splashback Cost?
At Ross’s, selected wall tiles suitable for kitchen splashbacks currently start from around $30/m², supply-only. Feature tiles and mosaics may be priced by the piece or sheet, so check how much area each unit covers before comparing the tile splashback cost.
You will also need to allow for adhesive, grout, trims and wastage. If you are hiring a tiler, wall preparation, cutting and the chosen laying pattern will affect the labour cost. A straight stacked layout will usually take less time than a detailed herringbone pattern with multiple cuts.
Small splashbacks can also attract a minimum labour or call-out charge. This means multiplying a tile price by the wall area will not always give you the complete installed cost.
How Much Does a Glass Splashback Cost per Square Metre?
The glass splashback cost varies according to the glass, colour, panel size and number of cut-outs required. Current Australian glass splashback cost estimates suggest:
- Basic clear toughened glass material starts from around $200/m².
- Low-iron glass generally costs around $250 to $400/m².
- Coloured or printed glass generally costs around $300 to $500/m².
- Custom-measured glass commonly costs around $450 to $600/m² before additional installation charges.
Power point cut-outs, corners, difficult access and specialist installation can all increase the final glass splashback price.
Ross’s does not sell glass splashbacks, so these are general Australian market estimates rather than our prices. If you are considering glass, ask a specialist supplier for a written quote that lists measuring, manufacture, cut-outs, delivery and installation separately.
So, is glass splashback cheaper than tiles? In most cases, no. Tiles normally offer a lower starting price and more room to adjust the material, pattern and installation cost to suit your budget.
Design Choice and Kitchen Style
The visual difference between a glass splashback vs tiles is easy to spot. Glass creates one continuous surface, while tiles use shape, texture, grout and laying pattern to become part of the kitchen design. Both can look excellent, but tiles give you far more ways to make the finish your own.
What Tiles Let You Change
Tiles give you control over colour, shape, size, finish and pattern. You can keep things simple with a classic subway tile, add fine detail with mosaics, or make the splashback a feature using Kit Kat or patterned tiles.
The laying pattern can change the result just as much as the tile itself. A vertical stack can make the wall appear taller, while herringbone adds movement. Larger tiles create a cleaner surface with fewer grout lines, which is worth considering if you like the seamless appeal of glass but still want the flexibility of tiles.
For more inspiration, our 2026 kitchen splashback ideas show how different tile styles can work with contemporary Australian kitchens.
What Glass Does Well
Glass works best when you want a smooth, uninterrupted surface with minimal joins. A single-colour panel can look clean and understated, particularly in a modern kitchen where the cabinetry and benchtop are already doing most of the visual work.
From my experience helping customers coordinate their kitchens, tiles make it easier to compare several looks and price points before committing. You can bring cabinet, benchtop and tapware colours together while deciding whether the splashback should blend in or become the main feature.
Cleaning, Maintenance and Repairs
If you are deciding between tiles or glass splashback, cleaning is probably high on your list of concerns. Glass removes grout from the equation, but it can show every fingerprint and streak. Tiles include grout lines, yet the glazed surfaces are simple to wipe and can be easier to repair later.
Cleaning Tile Splashbacks
Most glazed splashback tiles clean up well with warm water, a soft cloth and a suitable household cleaner. Grease needs more attention behind the cooktop, particularly if it settles into the grout.
Grout is the main maintenance concern people raise with me. It can discolour over time if spills and cooking residue are left sitting on it. However, choosing larger tiles reduces the number of grout lines, while regular wiping prevents most buildup from becoming a bigger job.
Avoid abrasive pads or harsh cleaners that could damage the tile finish or grout. Always follow the cleaning advice provided for the tile and grout products used in your kitchen.
Cleaning Glass Splashbacks
Glass gives you one continuous surface without grout, so there are fewer joins where cooking residue can collect. That makes wiping across the wall simple.
The trade-off is that fingerprints, grease marks and streaks can stand out on a glossy glass panel. Dark glass can make these marks particularly noticeable under kitchen lighting. You may spend less time cleaning joins but more time polishing the surface to achieve a streak-free finish.
Repairs and Replacement
Tiles have a practical advantage if part of the splashback is damaged. A tiler may be able to remove and replace an individual tile, provided a matching spare is available, and the surrounding installation can remain intact.
I always recommend keeping a few spare tiles after a renovation. Tile ranges change, and finding an exact colour and batch match several years later can be difficult.
Damage to a glass panel requires specialist assessment. Depending on its location and severity, the complete panel may need replacing. Changes to cabinetry, power points or appliances can also be harder to accommodate once a made-to-measure glass panel is in place.
Installation, Lead Times and Future Changes
The installation process is one of the biggest differences in a tile splashback vs glass splashback comparison. Tiles can be adjusted as the job progresses. Custom glass depends on accurate final measurements, planned cut-outs and specialist manufacture before it reaches your kitchen.
Installing a Tile Splashback
Tiles can be measured, cut and adjusted on site around corners, windows and power points. This gives the installer some flexibility if the wall is uneven or a dimension varies slightly from the original plan.
A capable DIY renovator may be comfortable installing a simple tiled splashback. However, accurate setting-out, consistent adhesive coverage and neat cuts still matter. Detailed patterns and walls with several obstacles can quickly make the job more difficult.
I ran into this on one of my own investment-property kitchens. A small change around the cabinetry affected how the splashback met an existing power point. Using tiles meant the layout could be adjusted on site without starting the whole splashback again.
If you plan to do the work yourself, our guide on how to tile a kitchen splashback explains the process in more detail. Use a qualified tradesperson whenever electrical work or another licensed trade is required.
Installing a Glass Splashback
A custom glass splashback normally requires final measuring or templating after the surrounding kitchen elements are in place. The supplier must plan the panel size, corners and power point cut-outs before manufacture.
This adds lead time and leaves less room for late changes. If a measurement or cut-out position changes after the panel has been made, the glass may need specialist assessment or replacement. Professional installation is generally required because of the panel’s weight, size and precise fit.
Glass Splashbacks Beside Cooktops
Glass beside a cooktop must meet the relevant Australian safety requirements. Standards Australia states that splashback glass adjacent to a cooktop must be toughened glass complying with AS/NZS 2208.
A specialist glass supplier and the relevant installer should confirm that the glass and its placement suit your cooktop. Always follow the appliance manufacturer’s installation instructions rather than relying on a general clearance measurement.
Tile and Glass Splashback Pros and Cons
By this point, the main glass vs tile splashback trade-offs are fairly clear. Tiles give you more control over price, appearance and on-site adjustments. Glass removes grout lines and creates a continuous surface, but it comes with a more involved installation process and less flexibility later.
| Option | Main advantages | Main disadvantages |
| Tile splashback | Lower starting product cost; wide choice of colours, shapes and patterns; can be cut and adjusted during installation; individual tiles may be replaceable | Grout needs cleaning; detailed patterns can increase labour; matching the original tile later is not guaranteed |
| Glass splashback | Smooth, seamless appearance; no grout lines; one continuous wiping surface | Higher custom cost; specialist measuring and installation required; fingerprints and streaks may show; damage or later changes may require panel replacement |
For most budget-conscious renovators, the disadvantages of tiles are easier to manage. You can reduce grout lines by selecting a larger tile, choose a straightforward pattern to control labour costs and keep spare tiles for possible future repairs.
Glass has one very clear advantage. It gives you an uninterrupted surface without grout. That may be enough to justify the added expense if a seamless finish is your main priority.
However, glass does not automatically win on cleaning or durability. It still needs regular wiping, visible marks can stand out, and damage can be more difficult to address. I would weigh that seamless appearance against the higher cost and reduced flexibility before making the final decision.
Which Splashback Is Right for Your Kitchen?
Choosing between a glass splashback or tiles becomes easier once you decide which result matters most. One homeowner may care mainly about price, while another wants the smoothest possible surface. Match the material to your priorities rather than choosing on appearance alone.
- Best for a lower product budget: Tiles are usually the better choice. Standard ceramic wall tiles offer an affordable starting point, while the wider range lets you increase or reduce the tile splashback cost to suit your renovation.
- Best for DIY potential: Tiles provide the more realistic DIY option. A capable renovator may be able to install a simple layout, although accurate preparation, cutting, setting-out and grouting are still essential.
- Best for design choice: Tiles give you more freedom across colour, size, shape, texture and laying pattern. They can blend quietly into the kitchen or become its main feature.
- Best for fewer grout lines: Glass provides a continuous surface without grout. Larger tiles are a useful middle ground if you want fewer joins without committing to a custom glass panel.
- Best for future flexibility: Tiles make it easier to adjust the layout during installation. An individual tile may also be replaceable later if you have kept matching spares.
- Best for a seamless contemporary finish: Glass is the clear choice if your priority is one uninterrupted surface. You will need to allow for specialist measuring, manufacture and professional installation.
For most Perth homeowners I speak with, tiles win on the combination of value, choice and flexibility. Glass still has its place, particularly in kitchens where the seamless finish matters more than price or the ability to make changes later.
If you have not narrowed your options down to these two materials, our guide on how to choose a kitchen splashback compares the broader practical factors.
Frequently Asked Questions
These are the questions homeowners commonly ask while comparing tile and glass splashbacks. The answers cover the main cost, cleaning and installation concerns without repeating the complete comparison.
Why I Recommend Tiles for Most Kitchen Renovations
After years of helping Perth renovators compare tile splashback vs glass splashback options, I recommend tiles for most kitchens. They give you far more freedom with colour, shape, texture and laying pattern, often with a much lower starting price.
Tiles are also easier to work around power points, cabinets and uneven walls. If one becomes damaged later, you may be able to replace that tile without removing the entire splashback. That flexibility can save plenty of frustration as a kitchen changes over time.
Glass still has its place. Its smooth, seamless surface has no grout lines and can look sharp in a clean, contemporary kitchen. However, it usually requires custom measuring, fabrication and specialist installation. Ross’s Discount Home Centre does not sell or install glass splashbacks, so you will need quotes from a glass supplier before comparing the complete project cost.
For most budgets, tiles offer the better balance of price, practicality and personality.
Compare our splashback tiles online or visit Ross’s Guildford showroom to see the colours, shapes and finishes in person. Our team can help you find an option
