
Kitchen Splashback Materials: Which One Is Right for Your Kitchen?
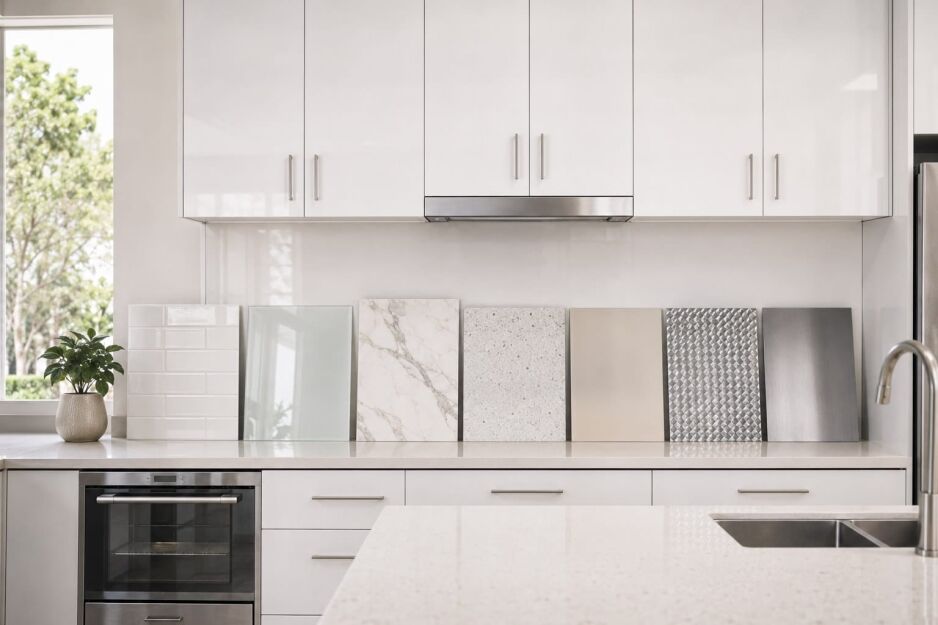
The range of kitchen splashback materials available to Perth homeowners has changed more in the last two years than in the decade before. Tiles, glass, and stainless steel have always been on the table, but the engineered stone ban that took effect in mid-2024 removed one previously common choice and pushed a wave of new alternatives into view.
I’ve noticed the shift here at Ross’s. The question used to be fairly straightforward: tiles or glass? Now I’m regularly talking through six or seven kitchen splashback options with customers, including materials like Densified Stone panels and large-format porcelain slabs that weren’t on most people’s radar a couple of years ago. Knowing what each material actually does, what it costs, and what suits a Perth kitchen specifically makes the decision much easier.
This article covers all of them, so if you’re wondering what kitchen splashbacks are made of, here’s the full picture: ceramic and porcelain tiles, glass, sintered stone, porcelain slab, Densified Stone panels, acrylic, laminate, pressed metal, and stainless steel. By the end, you should have a clear shortlist and a confident sense of which option suits your kitchen.
What Are Kitchen Splashbacks Made Of?

Tiles are the most popular kitchen splashback material in Australia, used in 56% of kitchen renovations according to the 2023 Houzz Australia Kitchen Trends Study. For most Perth homeowners, the choice comes down to tiles for budget and flexibility, glass for a seamless low-maintenance finish, or porcelain slab for a premium grout-free look that suits full-height applications.
Here is a quick map of every kitchen splashback option covered in this article.
- Tiles. The most widely used and most varied category: ceramic, porcelain, subway, feature, mosaic, and large-format. Suits almost any kitchen style and budget.
- Glass. A seamless, grout-free surface with strong low-maintenance appeal. Custom-made to size and available in a wide range of back-painted colours.
- Porcelain slab and sintered stone. Large-format, grout-free surfaces that deliver the premium stone aesthetic. Non-combustible and suitable for full-height splashback installations.
- Densified Stone panels. A stone-look panel splashback option available at Ross’s. Glue-on wall installation, DIY-friendly, and suitable for indoor use.
- Acrylic panels. A glass-like finish at a lower price point. Wide colour and finish range. Combustibility limitations apply near gas cooktops.
- Laminate hardboard. The budget entry point for panel splashbacks. Same combustibility considerations as acrylic. Best suited to electric or induction cooktops.
- Pressed metal. A non-combustible panel option with a traditional character. Paintable, DIY-friendly, and safe behind gas cooktops without additional backing.
- Stainless steel. The commercial kitchen look has made its way into residential kitchens. Non-combustible, hygienic, and easy to wipe clean.
Each of these gets a full section below: cost, maintenance, compliance, and what they suit best.
Tiles: The Most Popular Kitchen Splashback Material
Most Perth homeowners start with splashback tiles, and it’s easy to see why. The price range is wider than any other splashback material, the design options are genuinely extensive, and you can see them in person before buying, which matters more than most people expect. Grout colour, surface texture, and tile scale all look different on a screen than they do on a wall.
Tile Types Worth Considering
Ceramic tiles are the most affordable option, starting from $15/m² at Ross’s. They work well in standard kitchen conditions and come in a huge range of formats and finishes.
Porcelain tiles are denser and less porous than ceramic, and better for high-use kitchens or anywhere near a cooktop. They hold up better over time and are worth the step up in price if your kitchen gets a lot of cooking.
Subway tiles are one of the most consistent sellers at Ross’s, and it’s not hard to understand why. The rectangular format works horizontally, vertically, or in herringbone, and suits both traditional and contemporary kitchens equally well.
Feature tiles and mosaics are the design play: zellige, encaustic-look, kit kat, handmade styles. Most people use them as a focal zone behind the cooktop rather than across the whole splashback, which keeps costs manageable and the result striking.
Large-format porcelain gives you fewer grout lines and a cleaner overall look. It suits contemporary kitchens well, but it needs an experienced tiler. Larger tiles are much less forgiving on walls that aren’t perfectly flat.
Grout Maintenance: What Tile Splashbacks Actually Require
Grout is the main ongoing commitment with a tile splashback, and it’s worth thinking about before you choose your tile and layout. Behind a cooktop especially, unsealed grout picks up grease and steam quickly. I’ve seen splashbacks that looked great at installation and noticeably rough within a year, almost always an unsealed or wrong grout choice behind the cooking zone.
Epoxy grout is worth the extra cost in that area specifically. It resists cooking grease and staining far better than standard cement grout and doesn’t need sealing. For the rest of the splashback, a good cement grout sealed at installation and resealed every year or two is fine. On colour, tonal or colour-matched grout tends to age better than strong contrast. Minor discolouration between cleans is much less visible.
Gas cooktop: Ceramic and porcelain tiles are non-combustible and can be installed directly behind a gas cooktop without additional clearance or backing in accordance with AS/NZS 5601.1.
Cost (indicative supply only): Ceramic and subway tiles from $15/m² up to around $80/m² for mid-range porcelain. Premium handmade, large-format porcelain can reach $150/m² or more. Installation in Perth runs approximately $60–$90/m² for standard work, more for complex patterns or large-format tiles. For a typical 3–5m² splashback, budget $300–$600 for mid-range tile supply plus installation. All figures are indicative. Confirm current pricing before committing.
Glass Splashbacks
A glass splashback does one thing tiles can’t: it gives you a completely seamless, grout-free surface from one end of the splashback to the other. For many Perth homeowners, that’s the whole appeal. No grout lines to clean, no calcium build-up, no resealing. Just a flat, wipe-clean surface behind the cooktop and sink.
The two most common types are back-painted glass and clear float glass. Back-painted glass is the more popular choice. The colour is applied to the back of the glass, so you get a clean, solid finish on the wall-facing side in almost any colour you choose. Clear float allows the wall behind to show through, which works well over a feature wall or textured surface. If you’re working with pale or white colours, it’s worth specifying low-iron glass. Standard float glass has a slight green tint that can shift whites and pastels in ways that only become obvious once it’s on the wall.
No grout means no maintenance beyond a wipe-down with a damp cloth and mild detergent. For anyone who cooks regularly and has spent time scrubbing grout lines, that difference adds up quickly. Our tiles vs glass splashback comparison goes into more detail for anyone weighing these two specifically.
There are a few things worth knowing before you commit. Glass splashbacks are usually custom-made to size, so there’s a lead time. This isn’t a same-day purchase. The wall behind needs to be in good condition too; glass shows surface imperfections more clearly than tiles do, so preparation matters. And cutouts for power points must be specified before the glass is toughened. They can’t be made after.
Gas cooktop compliance: glass splashbacks behind gas cooktops must be toughened safety glass certified to AS/NZS 2208. Standard annealed glass is not permitted in this position. Confirm this with your installer before ordering.
Cost (indicative): toughened glass supply and installation runs approximately $250–$450/m² in Australia. More expensive than most tile options at the supply level, but installation is typically simpler given there’s no tiling labour involved. All figures are indicative. Verify with a glass supplier for a current quote.
Stone Splashbacks: Porcelain Slabs, Sintered Stone, and Panels
The full-height, grout-free splashback that runs seamlessly from benchtop to rangehood is the dominant premium look in Australian kitchens right now. For years, engineered stone was the go-to material for achieving it. That changed in mid-2024 with the high-silica ban, and the stone-look splashback materials used to deliver this look have shifted, but the look itself is very much still achievable, and in some cases better achieved, with what’s available now.
Crystalline silica-free stone options are available, along with sintered stone, large-format porcelain slabs, and natural stone. All are covered below.
Sintered Stone and Large-Format Porcelain
Sintered stone is an ultra-compressed mineral material fired at extreme heat. It is non-porous, non-combustible, and carries no silica risk for fabricators. Sintered stone and large-format porcelain are generally treated as non-combustible splashback materials, making them suitable behind gas cooktops when installed correctly under AS/NZS 5601.1 requirements. Heat, stain, and scratch resistant, with almost no maintenance required beyond regular cleaning.
Large-format porcelain slabs are aesthetically similar and also non-combustible. More widely available than sintered stone and generally lower in price, porcelain slab is the more practical choice for most Perth homeowners chasing the full-height stone look. Full-height splashback installations create a seamless, grout-free surface. Both materials are around $300–$600+/m² (supply only), and both require specialist installation. Neither is a DIY job.
If you want to see where the full-height stone look is heading, our kitchen splashback trends article covers what’s coming through in Perth kitchens right now.
Natural stone (granite, marble, and quartzite) is also used for stone splashbacks in Perth kitchens. It requires sealing and is more susceptible to staining than sintered stone or porcelain, but it’s the only material that gives you a genuinely unique surface.
Densified Stone Splashback Panels
Densified Stone panels are a stone-look splashback sheet option we stock at Ross’s: DIY-friendly, mid-range in price, and a genuinely good-looking alternative to a full slab installation. I’d recommend seeing them in person at Ross’s before deciding. The surface texture and scale read differently in person than in a product photo.
A customer came in a few months ago, convinced she was going to a porcelain slab from another supplier. Low maintenance was the priority, full stop. We pulled out our densified stone splashback panels while she was in the showroom, mostly so she could see how they compare. She left with densified stone. The in-person comparison changed the decision, which is exactly why I’d recommend coming in before committing to any kitchen splashback cost outlay above a few hundred dollars.
Installation is a glue-on wall application using suitable construction adhesive. At $295.00 per panel, our densified stone splashback panels are worth a look for anyone after the stone aesthetic without the specialist installation cost.
Budget Splashback Materials: Acrylic, Laminate, Pressed Metal, and Stainless Steel
Not every kitchen renovation needs to use a premium splashback material. For rental properties, secondary kitchens, or anyone working with a tight budget, there are several cheap splashback options that deliver a clean result at a fraction of the cost of tiles or glass. These splashback alternatives to tiles are worth understanding properly, particularly around gas cooktop compliance, before you commit.
Acrylic panels. A glass-like finish available from approximately $100–$180/m² supply (indicative). The colour and finish range is wide: gloss, matte, and metallic effects all available. Light and easy to cut, which makes them DIY-friendly for straightforward layouts. One important consideration: acrylic is a combustible material. Under the AS/NZS 5601.1:2022 gas installation standard, combustible materials within 200mm of a gas burner require a non-combustible backing board. Six-millimetre fibre cement sheeting is the standard approach. For electric or induction cooktops, no restriction applies.
Laminate hardboard. The most affordable kitchen splashback option at approximately $60–$100/m² supply (indicative). The same combustibility considerations apply as with acrylic. Non-combustible backing is required within the gas cooktop zone. Best suited to kitchens with electric or induction cooktops, or where the splashback is entirely outside the combustion zone. Specify moisture-resistant grade for kitchen use.
Pressed metal. A traditional and cottage-style option, and one of the few budget splashback panel materials that is non-combustible, safe behind gas cooktops without additional backing. Approximately $80–$120 per 1800x600mm sheet supply (indicative). Paintable in any colour, easy to cut and glue, and genuinely DIY-friendly.
Stainless steel. Non-combustible, so no restrictions behind gas cooktops. Approximately $150–$250/m² supply (indicative). Easy to wipe clean and hygienic. A matte or satin finish is more forgiving in a domestic kitchen than a polished or brushed finish. Fingerprints show more readily on high-sheen surfaces.
All prices are indicative supply-only figures. Installation costs are separate.
How to Choose the Right Kitchen Splashback Material
The right kitchen splashback materials for your kitchen come down to four things: cooktop type, maintenance preference, budget, and style. If you’ve worked through the sections above, you likely have a shortlist of two or three. This is the filter.
| Material | Indicative supply cost | Gas cooktop safe | Maintenance | DIY friendly | Best suited to |
| Ceramic / subway tiles | $15–$80/m² | Yes | Grout sealing required | With experience | Most kitchens, highest flexibility |
| Porcelain tiles (large-format) | $40–$120/m² | Yes | Low, minimal grout | Skilled install | Contemporary, minimal kitchens |
| Glass (toughened) | $250–$450/m² installed | Yes | Very low, no grout | No, specialist only | Modern, seamless finish kitchens |
| Sintered stone / porcelain slab | $300–$600+/m² | Yes, non-combustible | Very low | No, specialist only | Premium full-height splashbacks |
| Densified Stone panels | $295/panel | Indoor wall use | Low | Yes, glue-on | Stone-look on a mid-range budget |
| Acrylic panels | $100–$180/m² | With non-combustible backing | Low | Yes | Electric/induction kitchens |
| Laminate hardboard | $60–$100/m² | With non-combustible backing | Low | Yes | Budget kitchens, electric cooktops |
| Pressed metal | $80–$120/sheet | Yes, non-combustible | Medium, some paint care | Yes | Traditional and cottage kitchens |
| Stainless steel | $150–$250/m² | Yes, non-combustible | Low, fingerprint prone | Possible | Industrial or contemporary kitchens |
All prices indicative supply-only. Installation costs are additional.
Here’s how to easily choose the right material for your kitchen splashback:
- Tight budget, gas cooktop. Ceramic tiles are the answer: non-combustible, stain-resistant, and available from $15/m² at Ross’s. The most flexible kitchen splashback option at the entry price point.
- Low maintenance is the priority. Glass or large-format porcelain. No grout to seal, no lines to clean. Glass is the lowest maintenance surface available.
- Matching the benchtop look. Sintered stone, large-format porcelain slab, or Densified Stone panels. The seamless slab aesthetic is well served by all three.
- Renting or selling soon. Mid-range subway or ceramic tiles. Durable, easy to replace, and broadly appealing to buyers and tenants.
- Design is the brief. Feature tiles: zellige, mosaic, encaustic look. No other splashback material comes close for design range.
For anyone who has the material sorted and is now working through the design side (benchtop matching, colour, cabinetry coordination), our guide on how to choose a kitchen splashback covers that ground. And if you’re still browsing tile options, our full range of kitchen wall tiles is a good starting point.
Frequently Asked Questions
What Is the Best Material for a Kitchen Splashback?
The best kitchen splashback material depends on what you’re optimising for. Tiles are the most versatile starting point: wide price range, huge design choice, and suitable for any cooktop type. If low maintenance is the priority, glass or large-format porcelain slab removes grout from the equation entirely. For a premium full-height stone look, sintered stone or porcelain slab leads. Budget-first? Ceramic tiles or a laminate panel are where to start.
What Splashback Material Can I Use Behind a Gas Cooktop?
Non-combustible materials can be installed directly behind a gas cooktop without additional clearance or backing. The compliant options include ceramic tiles, porcelain tiles, toughened safety glass (to AS/NZS 2208), stainless steel, natural stone, and sintered stone, all classified non-combustible under AS/NZS 5601.1. Combustible materials such as acrylic and laminate can still be used with a compliant non-combustible backing board within 200mm of the burner. Confirm the specifics with your installer before ordering.
Are Engineered Stone Splashbacks Still Available in Australia?
Engineered stone splashbacks are no longer available in Australia. The manufacture, supply, and installation of engineered stone products was prohibited from 1 July 2024 under national workplace health and safety regulations. The ban applies to splashback panels and slabs, not just benchtops. The alternatives Perth homeowners are using instead are sintered stone, large-format porcelain slab, natural stone, and Densified Stone panels for a DIY-friendly mid-range option.
What Are the Cheapest Splashback Options for a Kitchen?
Ceramic tiles and laminate panels are the cheapest splashback options for a kitchen. Ceramic tiles start from around $15/m² supply, while laminate hardboard runs approximately $60–$100/m² supply. Both are budget-friendly entry points, though laminate carries combustibility limitations near a gas cooktop. For cheap splashback options that are also gas-cooktop safe without additional backing, ceramic tiles are the stronger choice.
How Do I Clean a Kitchen Splashback?
How you clean a kitchen splashback depends on the material, but most surfaces need nothing more than a damp cloth and mild detergent. Glass and porcelain slab are the easiest, with no grout to maintain. Tile splashbacks wipe down quickly, but grout lines need sealing and periodic cleaning, particularly behind the cooktop. Natural stone needs pH-neutral cleaners. In Perth, bore water leaves mineral deposits faster than scheme water, so non-porous or well-sealed surfaces make a practical difference.
So, Which Kitchen Splashback Material Should You Choose?
For most Perth homeowners, the decision on kitchen splashback materials comes down to three practical questions: what cooktop do you have, how much maintenance are you willing to do, and what’s your budget? Tiles cover the most ground, flexible on all three. Glass and large-format porcelain are the low-maintenance call. Densified Stone panels sit in the middle, bringing the stone look to a budget that doesn’t stretch to a full slab.
If you’re still weighing up kitchen splashback options, the best thing I can suggest is coming into Ross’s at 57 James Street, Guildford, before committing. The difference between a porcelain tile and something like a densified stone panel is much clearer in person than on a screen, and our team can walk you through what suits your kitchen specifically.
Browse our range online or visit us in store. Perth Metro delivery is available at a flat $100.
