
How to Grout Tiles: A Step-by-Step Guide for Perth DIYers
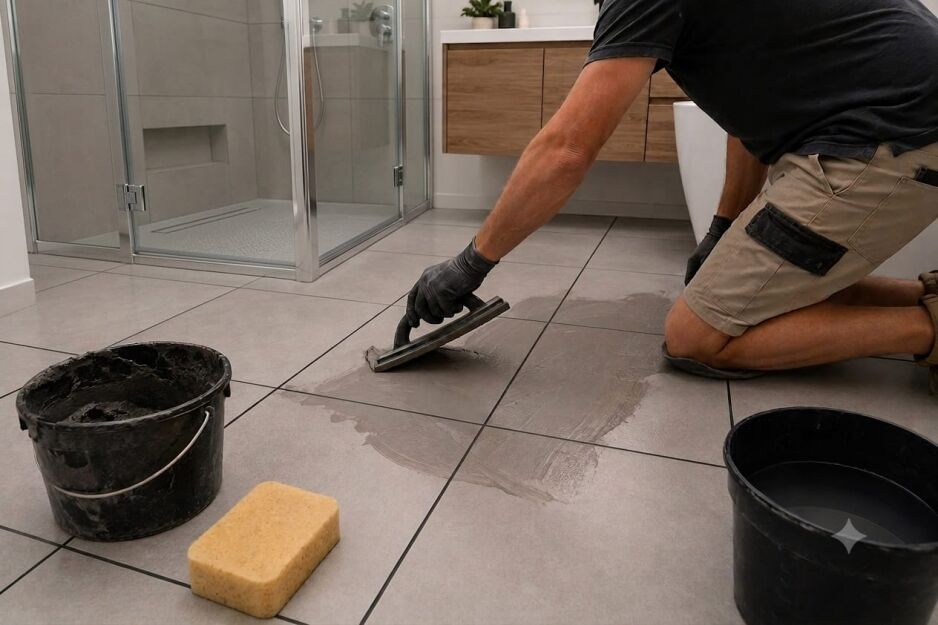
You’ve got your tiles laid and looking sharp. Now there is a bag of grout and a rubber float waiting for you. This is the part that worries most customers I talk to in our showroom. They’ve done the hard work. The tiles are straight and level. The last thing they want is messy grout joints, tile haze, or patchy colour. I understand the nerves, but I tell them the same thing every time. Grouting is very doable once you follow the right method.
Learning how to grout tiles comes down to a handful of steps done in the right order. In this guide, I’ll walk you through choosing the right grout, getting your tools ready, prepping the surface, mixing and applying grout, cleaning haze, then curing and sealing the joints. I’ll also cover what changes for floors, walls and showers, because grouting tiles in a bathroom brings a few extra things to watch.
If you haven’t laid your tiles yet, start with our guide to laying bathroom tiles from scratch, then come back when you’re ready for this step. Everything below assumes the tiles are down and you’re at the final stage.
What Grout Does and Why It Matters
Before you mix anything, it helps to know what grout actually does. Grout fills the gaps between your tiles, helps hold the edges steady, and keeps grime out of the grout joints. It also frames each tile and tidies up the finish, so neat grout lines make the whole job look properly done.
Here is the one point I want you to take away. Grout is not your waterproofing. In a shower or wet area, the waterproof membrane behind and under the tiles keeps the water out. The grout works on top of that system. Once you understand that, the next decision becomes easier: which grout should you buy?
Choosing the Right Grout for Your Tiles
Picking the right grout is the first real decision, and getting it right saves you a second trip to the shop. There are two calls to make: sanded or unsanded, and cement-based or epoxy. Get both right and the grout will do its job for years.
Start with sanded versus unsanded. Your joint width and tile surface decide it.
| Feature | Unsanded grout | Sanded grout |
| Best joint width | Approx. 1.5-3mm | Approx. 3-16mm |
| Typical use | Walls, splashbacks, polished or delicate tiles | Floors, wider joints |
| Texture | Smooth | Gritty, contains sand |
| Strength in wide joints | Can shrink and crack | Stronger, resists cracking |
Unsanded grout suits narrow joints and delicate tiles. It is smooth, so it fills tight gaps on walls and splashbacks without marking a polished face. Sanded grout suits wider joints, usually on floors, where the sand adds strength and helps stop the grout shrinking and cracking. That same grit can scratch a soft or polished tile. Measure your joints, check your tile surface, and let both guide your choice. If you are unsure, our team can match you to the right Kemgrout option in store.
I once watched a customer use sanded grout on glossy polished tiles. The grit left fine scratches he could never buff out. On polished or delicate tiles, always reach for unsanded grout unless the product instructions say otherwise.
Now make the second call: cement-based or epoxy. Cement-based grout is cheaper, easier to mix and more forgiving to clean up, which makes it the sensible pick for most DIY jobs. It is porous, so it needs sealing or a protective additive to help keep moisture and stains out. Epoxy grout is non-porous and stain-resistant. If you are looking for epoxy grout for shower walls or another wet area, it can hold up well against soap and constant moisture. The trade-off is that epoxy sets fast and can be hard to work with and clean if you have never used it.
For most DIY projects, my honest recommendation is a quality cement-based coloured grout. Our Kemgrout coloured grout, stocked in our grout and adhesives range, is a practical option for Perth DIYers. It is cement-based, suitable for wet areas when installed correctly, resistant to mould and fungi, and available in a range of colours. Colour is its own decision, so before you buy, run through our guide to choosing the right grout colour, then the grouting process becomes much easier.
Tools and Materials You’ll Need
Get everything together before you start, so you are not caught short halfway through with grout starting to firm up. Keep these tools and materials within reach:
- Your chosen grout
- A rubber grout float
- A clean grout sponge
- Two buckets, one for mixing and one for clean water
- A mixing paddle or sturdy stick
- A microfibre or soft buffing cloth
- Tile spacers, kept handy for reference
- Gloves
- A properly fitting P2 dust mask
That mask matters. Cement-based grout powder contains crystalline silica, and mixing or sweeping the dry powder throws up fine dust that is harmful to breathe, so wear the mask and mix in a well-ventilated spot. We stock grout and grout additive in store. The float, sponge and cloth are everyday tools you will find at any tool shop.
Preparing Your Tiles for Grouting
Good grout starts before you open the bag. A clean, cured surface lets the grout bond properly and keeps the finished joints sharp. The mistake I see most often is rushing this part, so resist the urge to grout as soon as the last tile goes down.
Work through it in order:
- Wait until the tile adhesive has fully cured, usually at least 24 hours. Grout too soon and you can shift the tiles or trap moisture underneath.
- Pull out the tile spacers.
- Clear dust, debris and any squeezed-out adhesive from the joints. A sharp blade lifts hardened adhesive without scratching the tile.
- Wipe the tile faces with a damp cloth.
- Mask off any adjoining painted surfaces, such as skirtings.
One more step matters for natural stone or heavily textured tiles: seal the face first. If you skip it, grout haze can settle into the pores and texture. Getting it back out is a real battle. Once the surface is clean and ready, you can mix.
How to Mix and Apply Grout

Mixing and applying grout are the two steps that shape the final finish. Get them right, and the joints come up clean and even. Rush them, and you can end up with cracking, patchy colour, or haze that fights you for days. One thing to plan around here in Perth is summer heat. Grout skins over fast in hot, dry conditions, so work in small sections of about one to one and a half square metres. Keep your sponge cycle tight, and avoid grouting in direct sun or in the hottest part of the day.
Mixing Grout to the Right Consistency
Knowing how to mix grout for tiles really comes down to consistency. Follow the maker’s instructions and add the powder to the water gradually, never the other way around. Mix to a smooth, dense toothpaste consistency. It should never be runny.
Too much water is the classic mistake. It weakens the grout and causes cracking and patchy colour, so use the same water ratio for every batch to keep the colour even across the job. Let the mix slake, which means resting it for a few minutes, then give it a quick re-mix before you use it. You can also swap some of the mixing water for a grout booster to improve the result, which I cover in the curing and sealing section.
Applying Grout With a Float
To grout tiles, load the rubber float with grout, hold it at a 45-degree angle, and press the grout diagonally across the joints until each one is full. Then scrape the excess off the tile face with the edge of the float. Work in small sections so nothing dries before you clean it.
If you want to know how to apply tile grout properly, work through it like this:
- Load a generous scoop of grout onto the rubber float.
- Hold the float at a 45-degree angle to the tiles.
- Press the grout diagonally across the joints, never along them, so you do not drag it straight back out.
- Roll your wrist as you go to push the grout deep into the gap, and check that every joint is packed full with no air pockets.
- Turn the float on its edge, hold it at a steep angle, and scrape the excess off the tile face.
That same basic method applies whether you are learning how to apply grout to a floor, a wall or a splashback. The main thing is to keep moving in manageable sections so the grout never gets ahead of you.
Cleaning Off Excess Grout and Haze

Grout haze is the cloudy film left across the tile face once the grout starts to dry. It catches almost everyone out because it does not show while the tile is still wet. The surface looks clean as you work, then dries to a dull fog an hour later.
Deal with haze early. Wait about 10 to 20 minutes for the grout to firm up in the joints, then wipe the tiles with a damp, not wet, sponge using light circular or diagonal passes. Rinse the sponge often and change your bucket water regularly; otherwise, you will smear thinned grout straight back onto the tiles.
Go over the grout lines a second time with a gentle pass to smooth them off. Once the grout has fully cured, buff away any last haze with a dry, soft cloth. One firm warning: never use vinegar or acidic cleaners on fresh or unsealed grout. Acid can eat into the grout and weaken the joints.
Curing and Sealing Your Grout
People often ask me, how long does it take to grout tiles? The hands-on work can be fairly quick. The curing is the wait. Cement grout usually reaches an initial set in about 24 hours, then needs another 48 to 72 hours to cure properly. Keep it dry and away from foot traffic during that window, and follow the product instructions.
Cement grout needs protection against Perth’s hard water, which can stain light grout in showers and splashbacks. It can also leave efflorescence, a chalky white bloom, on the surface. There are two ways to help reduce those problems:
- Mix in protection: Stirring a grout additive like Grout Booster into the grout can improve stain and water resistance, help keep colour even, and reduce cracking.
- Seal after curing: Once the grout has fully cured, a penetrating grout sealer adds another layer of protection against moisture and stains.
I often suggest a grout additive like Grout Booster when customers are working on showers, splashbacks, or light grout colours. Perth’s hard water can be unforgiving, and a bit of extra protection at this stage is much easier than trying to remove staining later. Ask our Guildford team which sealer or additive suits your grout before you start.
One last rule. Never grout where two walls meet or where a wall meets the floor. These are movement joints, and the tile installation standard AS 3958.1 calls for flexible sealant in these areas because silicone can move with the building. Rigid grout usually cracks there.
Grouting Floors, Walls and Wet Areas
The basics stay the same across the house, but each surface has a few quirks worth knowing before you start. Floors need strength, walls need control, and showers need extra care with curing, sealing and movement joints.
How To Grout Floor Tiles
Floors follow the same float method covered above, with a few tweaks. Joints are often wider on floor tiles, so sanded grout is usually the one to reach for, since the sand adds strength. Work backwards to the door so you are never kneeling on grout you have just laid. Keep the float flush so the grout finishes level with the tile and water runs off instead of pooling in the joints.
How To Grout Wall Tiles and Splashbacks
The float method still applies on wall tiles and splashbacks, but the joints are usually narrower. Unsanded grout gives a smooth, clean finish in these areas. The thing to manage here is gravity, so work from the bottom up, keep fallen grout on the tiles you have not finished yet, and lay drop sheets to catch what drops.
How To Grout Tiles In A Shower
Showers need the most care, but remember that grouting tiles in a shower does not make the area waterproof. The waterproof membrane behind the tiles does that job, in line with the wet-area standard AS 3740. The grout works on top of it.
If you are working out how to grout tiles in a bathroom, pay close attention to wet-area zones. Treat cement grout with an additive or seal it once cured, since a shower is the wettest zone in the house. Run silicone through internal corners instead of grout. Some people choose epoxy for showers because it is non-porous, which is a fair option if you are confident working with it.
Common Grouting Mistakes to Avoid
Most grouting problems come down to a handful of avoidable slips. If you can sidestep these, you are well on your way to a cleaner finish.
- Too much water: A runny mix weakens the grout and leaves you with cracking and patchy colour, so mix firm and keep the ratio the same across every batch.
- Leaving the haze too long: Wipe the grout haze while it is still soft because dried haze can take hours to remove from the tile face.
- Grouting the corners: Rigid grout cracks wherever two surfaces move against each other, so run silicone through internal corners and edges instead.
- Skipping the cure or seal: Cut the curing time short or skip protection, and you invite staining and moisture problems that bite harder in Perth’s climate.
- Grouting in the heat of the day: Our summer heat can flash the grout off before you can tool and clean it, so work early or late and stay out of direct sun.
Frequently Asked Questions
Ready To Grout Your Tiles With Confidence?
Knowing how to grout tiles comes down to a clear run of steps. Choose the right grout for your joints and tiles, prep the surface properly, mix it firm, apply it on the diagonal, clean the haze early, then cure and protect. For most Perth DIY jobs, my pick is a quality cement-based coloured grout with added protection against hard water, because that is what holds up best over time here.
When you are ready to start, pick up grout and Grout Booster in person at our Guildford showroom, where our team can match you to the right products for your tiles. Prefer to shop from home? Order online from our grout and tile adhesives range, and we will deliver across Perth Metro from $100. Get the grout right, take your time, and the finish will look like the work of someone who has done it plenty of times before.
